I recently moved to a new place with more space for my gadgets, so one of the first things on my list after moving in was to buy a rack and start building out my new homelab.
My previous homelab was built at my parent’s house and has been running there for years since I’ve moved out. I use Ubiquiti’s Site Magic SD-WAN to connect to my home network to my parent’s, but it’s still difficult to deal with physical maintenance, outages, and latency when the equipment isn’t located in my own home.
I will be decommissioning my existing server and using some parts for my new custom server build, but I will be leaving the networking gear behind and plan to hold on to the server for a while so I can play with IPMI while developing Rack Manage Agents. The server is 13 years old now and was already showing it’s age when I picked it up from a government surplus auction years ago, so I think it’s time to upgrade to something newer that better suits my needs.
While there are various other pieces of Ubiquiti equipment running my existing homelab, the core of the lab is the following:
- Ubiquiti Dream Machine Pro
- Ubiquiti Switch Lite 8 PoE
- Eaton 5S 1500LCD UPS
- Dell PowerEdge T110 II Tower Server running Proxmox
- Intel Xeon E3-1220 with 32 GB RAM
- 512 GB SSD Boot Disk
- 2 x 4 TB SATA HDDs in RAID 0 for VM Storage
- 4 x 600 GB SAS HDDs in RAID 10 for Backup Storage
- Raspberry Pi 3
- Running Network UPS Tools connected to Eaton UPS
Server Rack
First things first, I wanted an actual rack so I can mount my equipment and have room to grow. While it might be nice to have a 24U+ metal rack in my office, I’m sure my partner would object and I don’t need that much equipment, so we’re going for something a bit nicer: the Gator Frameworks Elite Desk 10U.
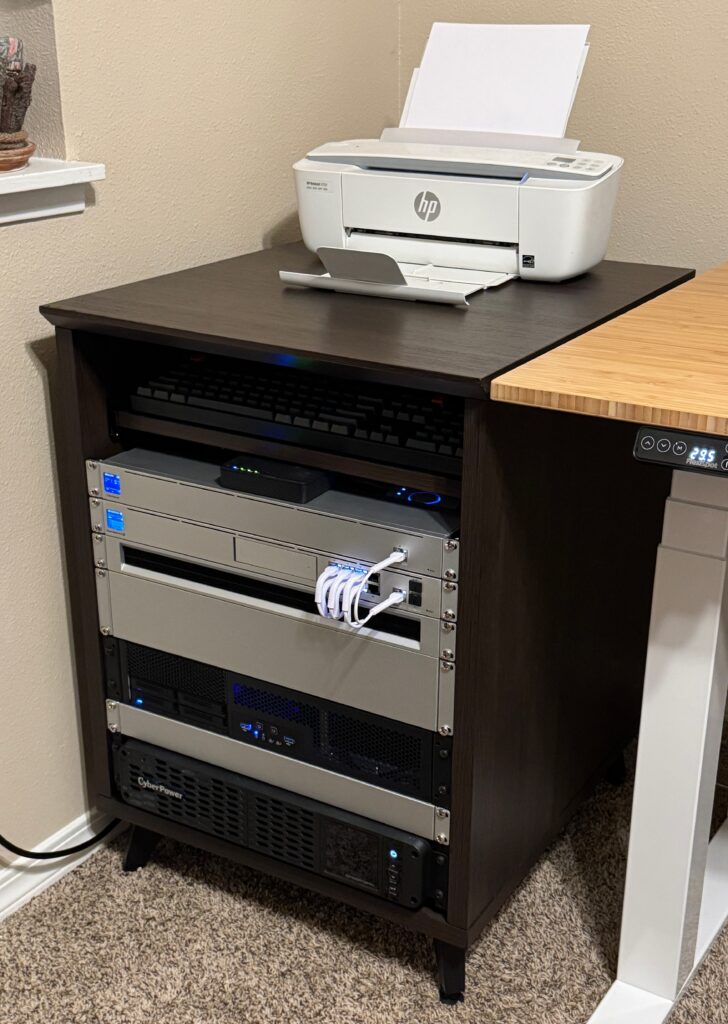
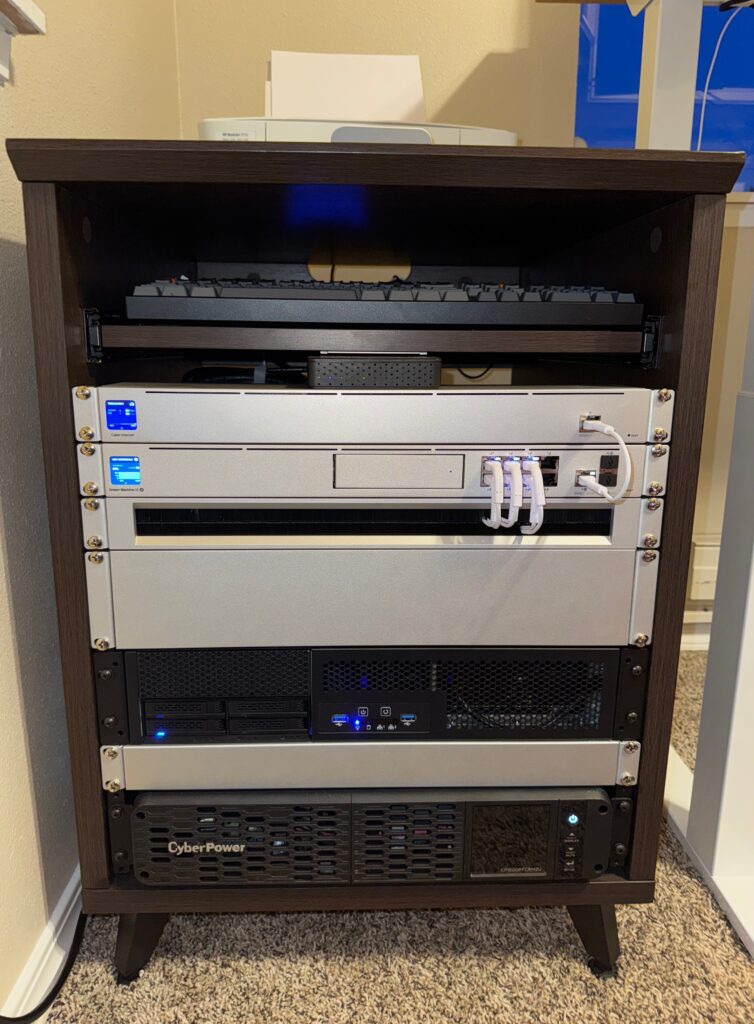
Gator Frameworks is well known in the A/V world and their equipment is typically designed to hold audio gear, but I haven’t seen many posts of people using their racks for homelabs. The Elite Desk is the perfect size for my homelab and blends in well in my office. It has a nice pull out shelf and doubles as an end table.
There aren’t back rails for mounting servers, but the Elite Desk is the perfect depth to hold my new server chassis with a lip at the back to support the weight of my server.
Networking
Next up, I need some rack mount network equipment. In my old apartment, I was using a Ubiquiti Dream Router with a couple security cameras but was running out of resources to run Unifi Network / Protect, and was hitting the maximum number of applications and cameras. I still want to use Ubiquiti gear but I needed more PoE ports and the ability to run more UniFi applications and cameras so I looked toward Ubiquiti’s Dream Machine and Cloud Key products. I was split between getting a Dream Machine Pro + a PoE switch or getting the Dream Machine Special Edition, but ultimately decided on the Dream Machine SE which offers 8x GbE PoE ports, 2.5GbE & 10G WAN ports and a 10G LAN port all in one box. While it wasn’t necessary at all to upgrade my modem, I wanted to rack mount that if possible too, so I ended up picking up the UniFi Cable Internet. Best of all, my company’s home office stipend paid for both!
Outside of the rack, I eventually added a Switch Lite 8 PoE for my media center connected through some Hitron 2.5 Gb MoCA adapters, and a U6 Mesh and U7 Pro for WiFi. To round things out, I also grabbed a handful of UniFi ultra thin patch cables and Rack Mount OCD Panels for cable management and aesthetics.
It’s worth noting that the ethernet status LEDs on the Ubiquiti Dream Machine SE are the brightest LEDs I’ve ever seen on network equipment so I would recommend picking up some of these LightDims stickers to cover the LEDs if you’re planning to place your rack in an office / living room / bedroom like me.
Battery Backup
Although I like the Eaton 5S 1500‘s, and the two that I own have been running well for years, Eaton rack mount UPS’ are quite expensive, so I went for the CyberPower CP1500PFCRM2U instead, a 1500VA 2U Sinewave rack mount UPS with USB, Serial, and expansion ports.
The UPS is basically plug-and-play, but I also connected the USB port to my server running Network UPS Tools and PeaNUT to monitor the UPS. With this UPS I get an estimated 100+ minutes of runtime while powering my entire rack and some additional peripherals like my printer.
Server
I’ve looked at getting refurbished servers from Dell or HP in the past, but this rack is going in my home office where I work all day and I will go crazy if I have to hear server fans revving for hours on end, so I decided to do a custom server build.
I tried to find a happy medium between cost, efficiency, and reliability, and ended up with the following build:
- Case: SilverStone RM23-502 2U Server Chassis
- Motherboard: ASRock Z690 Steel Legend
- CPU: Intel i5-13500
- RAM: 64 GB Crucial Pro DDR4
- Cooler: Noctua NH-L12 Ghost S1
- PSU: Thermaltake GF A3 650W
- Chassis Fans:
- 3x Noctua NF-A8
- 1x Noctua NF-A6x25
- Storage:
- Other:
You can view the full parts list on PC Part Picker, but some of the server components won’t have proper pricing listed, so I recommend searching the parts on Amazon instead.
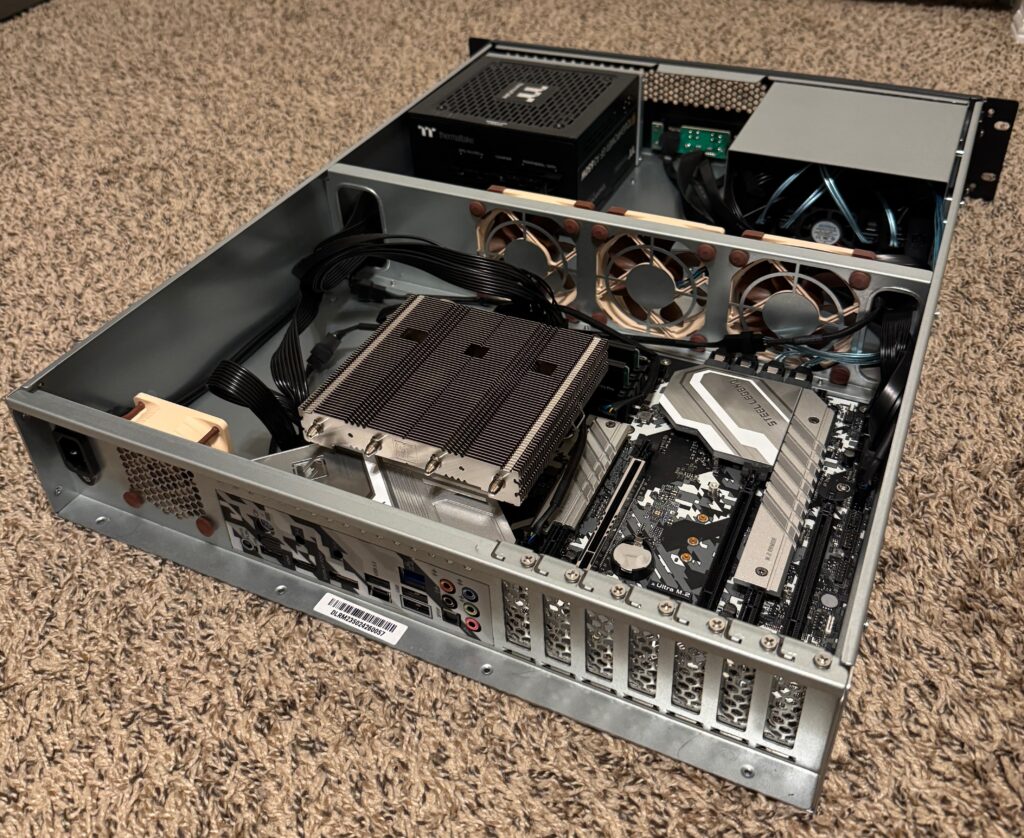
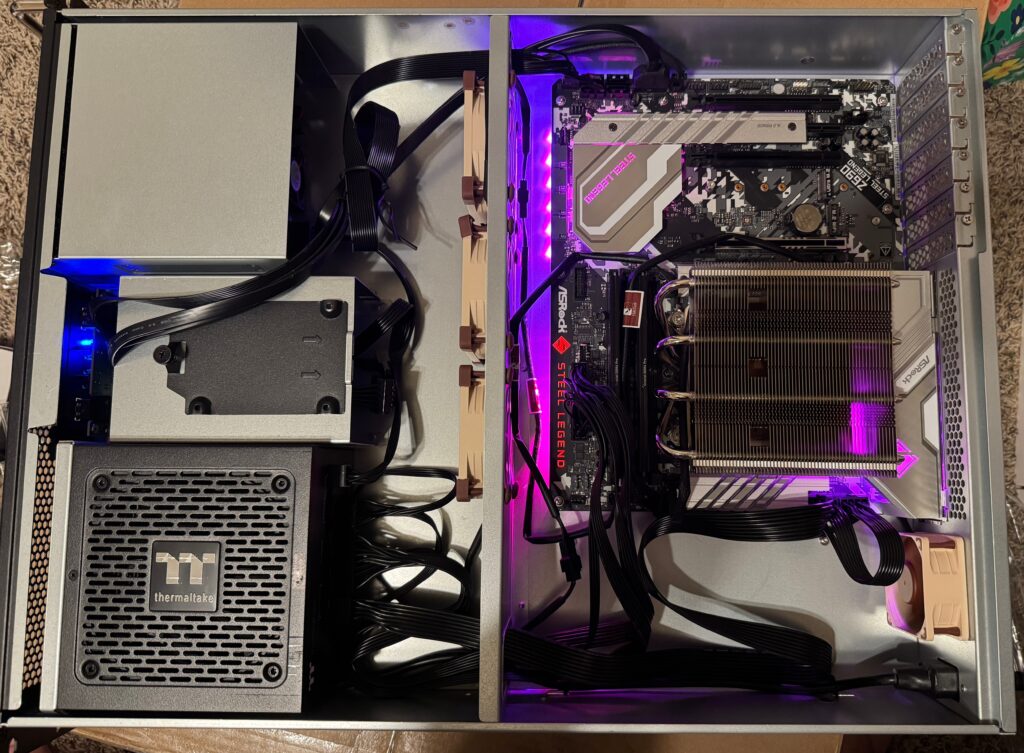
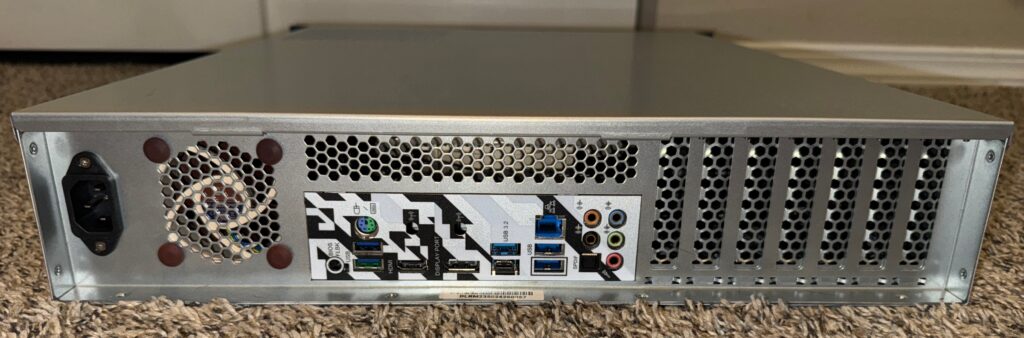
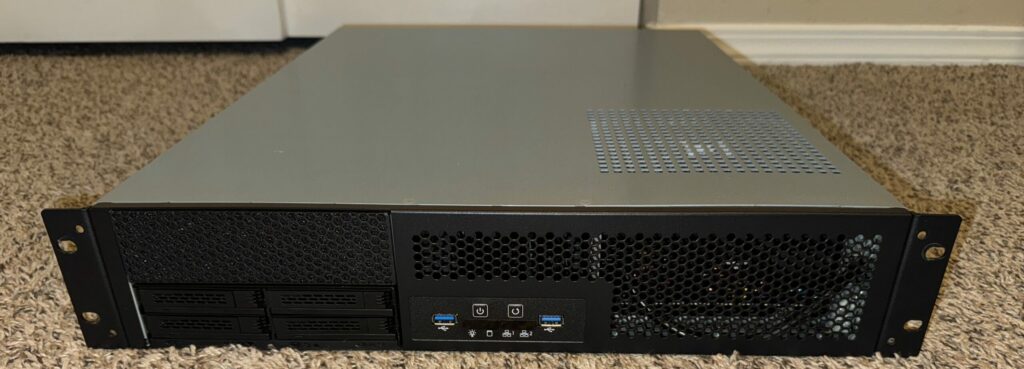
For some more detail on some of the part choices, I chose the RM23-502 because it was one of the only 2U chassis I found that supports a full size ATX motherboard and PSU, and still has plenty of space for expansion with 7x low profile expansion slots, 5x 3.5″ slots, 1x 2.5″ slot, and 2x 5.25″ bays, as well as removable drive cages if you need more space or airflow. While it was a bit longer than I wanted and I could have gone for a smaller chassis if I used a Micro-ATX or Mini-ITX motherboard, this chassis still fit perfectly in the Gator Frameworks rack and was the perfect length to sit on the back lip of the rack for some extra support without the need for rails.
I chose the Z690 Steel Legend because the motherboard has a 2.5Gb ethernet port, 8x SATA connectors, and 3x M.2 slots, as well as multiple PCIe x16 slots in case I want to add a GPU or 10 GbE networking card in the future. The i5-13500 was a compromise between efficiency and performance where the CPU has a relatively low power draw but has plenty of cores for VMs and a good integrated GPU for transcoding.
The Noctua NH-L12 Ghost S1 is technically too large for the chassis according to SilverStone’s specifications but fit perfectly in the case with plenty of room to spare, and most importantly, the server is silent and cool thanks to the Noctua fans. My hope was that since the NH-L12 is designed with the fan underneath the heatsink, there will be enough room for airflow which may be more restricted if the fan was right up against the top panel of the chassis.
Although my plan was initially to use the 3.5″ spinning disks from my old server, I had concerns about the airflow restrictions, heat, and noise generated by mechanical drives, so I made the decision to switch to SSDs instead to keep the server silent. Enterprise drives are too expensive, but consumer grade drives have too low of a TBW (Terabytes Written) rating for sustained use by virtual machines, so the WD Red SSDs were a good compromise between price and reliability.
In it’s current configuration, the server weighs about 24 lbs, draws about 35W when idle, and cost $1560. While I was hoping to stay under $1000, I would have met that goal at $990 if I used the existing HDDs from my old server rather than buying the NAS grade SSDs (which was a last minute decision that added $570), but I’m hoping that they will be worth it to have a more reliable, cooler, and quieter server in the long run. You can save a little extra if you forgo the ICY Dock hot swap bay, but this makes it much easier to add / change drives in the future without unracking the server.
Future Upgrades
I still haven’t transplanted any hardware from my old server yet, but some potential ideas for the future include adding:
- Low profile GPU
- 10GbE SFP card
- Hardware RAID card
- JetKVM for remote management
- HDDs for backup storage
- Second boot SSD to run in RAID 1
As an Amazon Associate I earn from qualifying purchases.