For years I have been building and managing task sequences in MECM for various applications and device types. What resulted is folders full of task sequences that have tons of shared logic, with the primary differences being the images being applied, applications installed, and network settings.
While there isn’t anything wrong with this approach, it’s been painful when there’s an emergency because a network credential expires, a default application needs to be updated, or we simply want to add more features to all task sequences, requiring me to go through and update each task sequence one at a time. Additionally, in my environment, we wanted a solution for managing task sequences from accounts that didn’t have permissions to deploy to unknown computers.
The solution I came up with that solves all of these problems is something I call “Choose Task Sequence”. Choose Task Sequence is a single task sequence that can be deployed to all collections and unknown computers, and encapsulates other child task sequences, allowing technicians to add new Operating System Deployment (OSD) options and launch these options, all from the same task sequence and without ever creating a deployment.
As a fair warning, this task sequence is complicated and may not be a good fit for everyone. It solves all of the problems we were facing, but contains a lot of conditional logic which could lead to issues if configured improperly and may take some effort to maintain. Hopefully this post will aid you in doing so.
The logic can be simplified to your liking by extracting conditional logic into the child task sequences, but that may also lead to duplication of steps which is one thing I tried to avoid. I will show a few options with varying degrees of conditional logic depending on how much you want to implement.
Choose Task Sequence is based on Building a Better Task Sequence by A Square Dozen and uses UI++ for most of the user interface.
How it Works
Choose Task Sequence will be deployed as a normal task sequence and will show up in your list of task sequences as normal. If you wish, you can create task sequence media to automatically launch Choose Task Sequence to skip the MECM prompt.
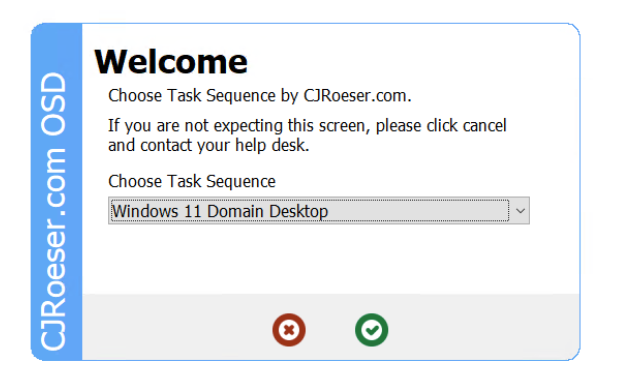
Once launched, Choose Task Sequence will prompt the technician for the child task sequence they wish to launch. Additionally, I will show an option at the end of this article on how you can deploy standalone options that auto launch a child task sequence without the choice prompt.
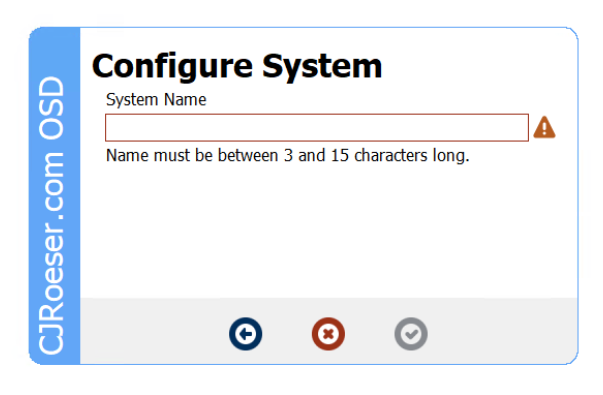
After choosing the Task Sequence, the technician will be prompted for the name of the computer. This prompt can easily be removed, or more options can be added using UI++.
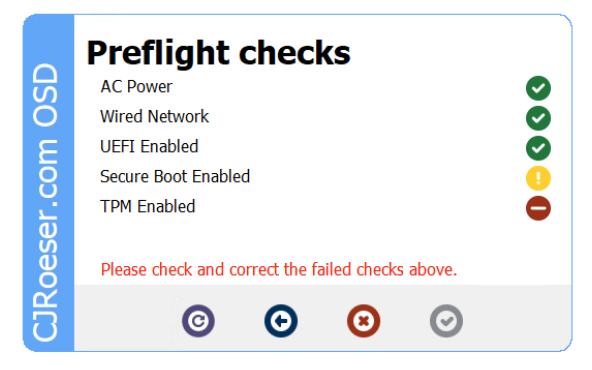
Finally, the task sequence will run through preflight checks using UI++. Again, this step can be disabled if desired. You can also integrate the “Check Drivers” script from the previous article to run driver checks during the preflight step.
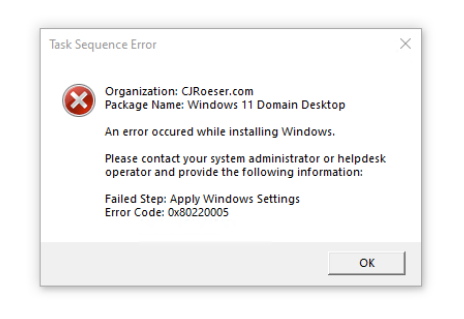
The task sequence will then run through all of your specified logic, if any errors are encountered, the task sequence will catch them and show a custom error prompt.
Choose Task Sequence is configured using a PowerShell array which automatically configures the UI and task sequence variable for conditional logic.
@{Name = "Windows 11 Domain Desktop"; Type = "Domain"; Image = "Windows11";}Within this array you can add any values you wish to use inside of your task sequence, and they will automatically be converted into task sequence variables like ChooseTS_Type and ChooseTS_Image.
Part 1: Task Sequence Layout (Try/Catch Block)
Before we can set up any dynamic logic, we need to get the layout of the task sequence setup. To start, we will be using a system based on the Building a Better Task Sequence framework to provide try/catch block style error handling. With this logic, any errors encountered in the “Main” block of our task sequence will be caught and stored to variables which we can use in the “Failure” block.
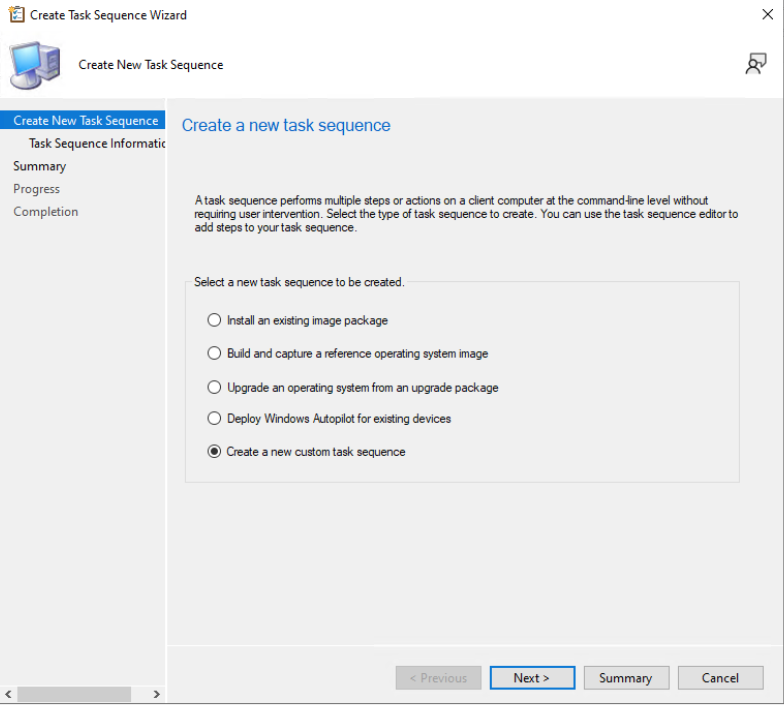
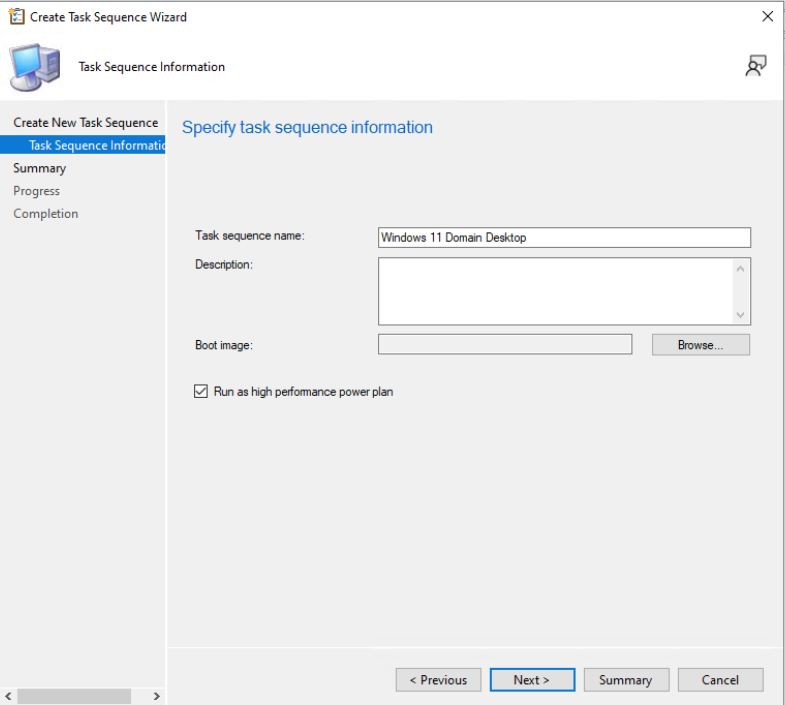
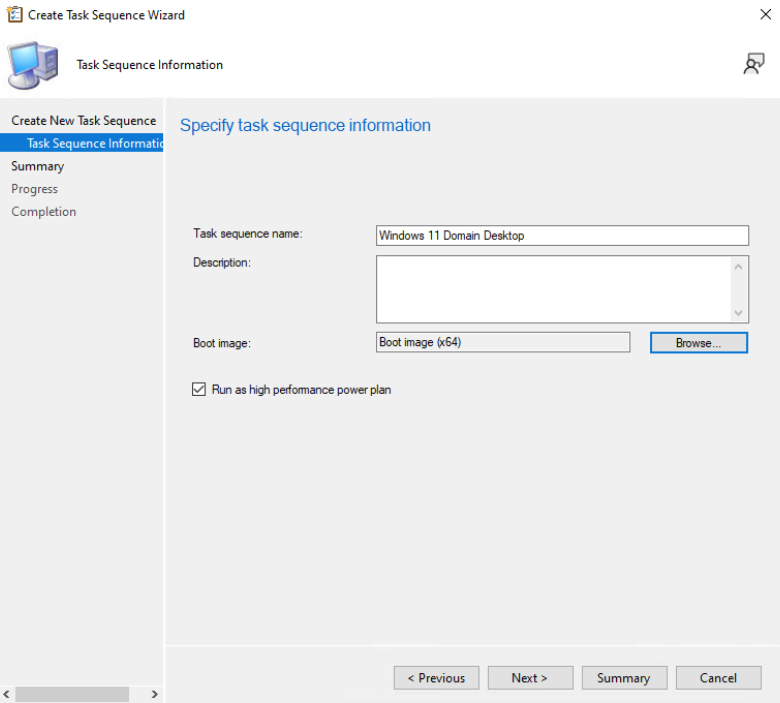
First, create a new custom task sequence called “Choose Task Sequence” with a boot image applied.

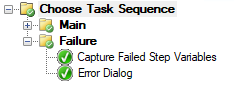
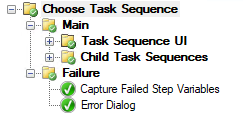
Then, create a group to hold all of your task sequence steps, and create two sub groups, “Main”, and “Failure”. Ensure that “Main” and “Failure” have “Continue on error” enabled.

On the “Failure” group, add a condition to run if the “_SMSTSLastActionSucceeded” variable equals “False” and if “UIPlusPlusIgnoreError” does not equal “True”.

Next, inside of the “Failure” group, add a “Set Dynamic Variables” step with the following content:
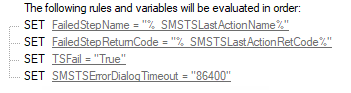
Finally, add a “Run PowerShell Script” block at the end of the “Failure Group” to display an error dialog. In this case, I named the “Set Dynamic Variables” step to “Capture Failed Step Variable” and the “Run PowerShell Script” step to “Error Dialog”.
Ensure that you are using the “Enter a PowerShell script” option rather than “Select a package with a PowerShell script” option, as this will ensure that the block is run from memory rather than from disk, which is necessary in the event of a disk error.
Set the value of the PowerShell script to the following:
Show Code Block
$TSEnv = (New-Object -COMObject Microsoft.SMS.TSEnvironment);
(new-object -ComObject Microsoft.SMS.TsProgressUI).CloseProgressDialog();
Add-Type -AssemblyName PresentationFramework

$ErrorMessage = @"
Organization: $($TSEnv.Value('_SMSTSOrgName'))
Package Name: $($TSEnv.Value('_SMSTSPackageName'))

An error occured while installing Windows.

Please contact your system administrator or helpdesk operator and provide the following information:

Failed Step: $($TSEnv.Value('FailedStepName'))
Error Code: $($TSEnv.Value('FailedStepReturnCode'))
"@

[System.Windows.MessageBox]::Show($ErrorMessage, "Task Sequence Error", "OK", "Error");
Great! Now we have a basic task sequence framework with error handling. This logic will catch any failures that occur in the “Main” block (as long as they don’t have “Continue on error” checked) and will display the step name and error code in a custom error dialog.
If you want to add some more features to your error handling, check out my article on copying the SMSTS log to a network share or Terence Beggs’ post on sending Teams OSD notifications.
Part 2: Task Sequence UI & Child Task Sequences
Next, we can start setting up the task sequence UI using UI++, and use the output of UI++ to launch our child task sequences.
First, add two new groups to the “Main” section of your task sequence, “Task Sequence UI” and “Child Task Sequences”. These new groups should not have “Continue on error” set.
We’ll start in the “Task Sequence UI” group by configuring some default variables for the UI as well as setting the options for our task sequences. First add a “Set Dynamic Variables” step (named “Set Task Sequence Variables”) to the group with the following content:
Feel free to define other variables here as needed, such as “SMSTSDownloadRetryCount”, “OSDPreserveDriveLetter”, etc.
Next, add a “Run PowerShell Script” step (named “Define TS Choices”). Ensure that the script is set to bypass execution policy, and paste the following code using the “Enter a PowerShell script” option. Do not use a PowerShell file here as that may lead to errors if the hard drive of the target machine has not been formatted properly prior to launching the UI.
Show Code Block
$c=@(

##### DEFINE CHOICES HERE - DO NOT EDIT ABOVE #####
##### MAKE SURE LAST OPTION DOES NOT HAVE TRAILING COMMA #####

@{Name = "Windows 11 Domain Desktop"; Type = "Domain";     Image = "Windows11"; },
@{Name = "Windows 11 Laptop";         Type = "Non-Domain"; Image = "Windows11"; }

##### END DEFINE CHOICES - DO NOT EDIT BELOW #####

)

$choices = ""

foreach ($o in $c) {
    $choices += "<Choice Option='$($o.Name)' Value='$($o.Values -join '~!~')' />`n"
}

$TSEnv = (New-Object -COMObject Microsoft.SMS.TSEnvironment)
$TSEnv.Value('ChooseTS___OptionsList') = $choices
$TSEnv.Value('ChooseTS___OptionsOrder') = $($c[0].Keys -join '~!~')
Feel free to add or delete options as needed, but make sure that all options have a “Name” property, and that all options have the same properties in the same order. All properties added here will be converted to task sequence variables named “ChooseTS_%Property%” (i.e. ChooseTS_Name) for use in the task sequence. We will be using the “Type” and “Image” values in part 3, but you can skip using these variables if desired.
Now, create three new groups inside of “Task Sequence UI” called “TS UI (Pre-Format)”, “Prepare OS Disk”, and “TS UI (Post-Format)”. This system assumes that you want to format the hard drive during OSD, but if you do not want to perform a drive format, simply skip adding the “TS UI Pre-Format” and “Prepare OS Disk” groups.
This pre- and post-format logic is required as UI++ must launch an executable, and if the disk is not formatted properly, the executable cannot download to the computer. We will attempt to launch the UI in the pre-format group, and if we encounter an error because the executable could not be downloaded, we will prompt the user that we need to format the drive. After the user confirms and we format the drive, we will launch the UI in the post-format group.
All error prompts will be written in PowerShell steps using inline scripts, as they run from memory and do not require that files are written to the disk, therefore they can run on PCs with disk related issues.
Task Sequence UI
TS UI Package
Before we can use the UI, we need to create a package to contain the source files. This includes UI++ and it’s dependencies, the XML template for UI++, and a PowerShell script to launch the UI.

UI++ is located inside of the x64 folder with the following contents:

Download UI++ by visiting https://uiplusplus.configmgrftw.com/download/. If you need to use the 32-bit version of UI++, add the x86 folder instead, and modify the ChooseTaskSequence.ps1 script below to call x86 instead of x64.
Download ChooseTaskSequence.ps1 and ChooseTemplate.xml from GitHub or use the code blocks below:
Show ChooseTaskSequence.ps1
<#
.SYNOPSIS
This script launches UI++ with dynamic choices based on Task Sequence Variables.

.DESCRIPTION
The script sets up the environment for a UI++ execution and dynamically modifies an XML template based on Task Sequence Variables.

.NOTES
- Author: Carter Roeser
- Last Updated: 2024-03-12
- Please ensure PowerShell Execution Policy allows script execution and that all paths and dependencies are correctly configured in your environment.
- Designed to be used in an MECM task sequence, where automation of driver installation is crucial. Will fail if the Task Sequence Environment COM object is not available.
- Make sure to adjust the script paths and environment variables according to your specific deployment environment.

#>

# Setup TSEnv - Read and Write default Task Sequence Variables
$TSEnv = New-Object -ComObject Microsoft.SMS.TSEnvironment
$choices = $TSEnv.Value('ChooseTS___OptionsList')
$choicesOrder = $TSEnv.Value('ChooseTS___OptionsOrder')
$choicesKeys = $choicesOrder -split '~!~'

$tsVars = ""

foreach ($i in 0..($choicesKeys.Length - 1)) {
    $tsVars += "<Action Type=`"TSVar`" Name=`"ChooseTS_$($choicesKeys[$i])`">Split(`"%TSChoice%`", `"`~!~`"`)($i)</Action>`n"
}

$templateContent = Get-Content "$PSScriptRoot\ChooseTemplate.xml" -Raw
$updatedContent = $templateContent -replace '<TSVarPlaceholder />', $tsVars
$updatedContent = $updatedContent -replace '<ChoicesPlaceholder />', $choices
$outputPath = "$Env:SystemDrive\UI++\ChooseTemplate.xml"

# Ensure the UI++ directory exists
if (-not (Test-Path "$Env:SystemDrive\UI++")) {
    New-Item -Path "$Env:SystemDrive\UI++" -ItemType Directory
}

# Save the modified content to the output path
$updatedContent | Set-Content $outputPath

# Run UI++ with the XML
Start-Process -Wait x64/UI++64.exe /config:"$Env:SystemDrive\UI++\ChooseTemplate.xml"
Show ChooseTemplate.xml
<?xml version="1.0" encoding="utf-8"?>
<UIpp Title="CJRoeser.com OSD" Color="#5fa5fa">
	<Actions>
		<Action Type="TSVar" Name="UIPlusPlusStarted">"True"</Action>

		<ActionGroup Name="Choose Task Sequence" Condition='"%ChooseTS_Name%" = ""' >
			<Action Type="Input" Name="ChooseTaskSequence" Title="Welcome" ShowCancel="True">
				<InputInfo>Choose Task Sequence by CJRoeser.com.</InputInfo>
				<InputInfo NumberofLines="2">If you are not expecting this screen, please click cancel and contact your help desk.</InputInfo>
				<InputChoice Variable="TSChoice"  Default="Windows 11 Domain Desktop" Sort="False" Question="Choose Task Sequence" Required="True" AutoComplete="False">
					<!-- ChoicesPlaceholder will be replaced via PowerShell on TS run. -->
					<ChoicesPlaceholder />
				</InputChoice>
			</Action>

      <!-- TSVarPlaceholder will be replaced via PowerShell on TS run. -->
			<TSVarPlaceholder />
		</ActionGroup>

		<Action Type="Input" Name="SetupTaskSequence" Title="Configure System" ShowCancel="True" ShowBack="True">
			<InputText RegEx=".{3,15}" Variable="OSDComputerName" Question="System Name" Required="True"/>

			<InputInfo>Name must be between 3 and 15 characters long.</InputInfo>
		</Action>

		<ActionGroup Name="Preflight" Condition='NOT "%EnablePreflight%" = "No"'>
			<Action Type="DefaultValues" ValueTypes="Asset,TPM,Network" ShowProgress="True" />
			<Action Type="Preflight" Title="Preflight checks" ShowOnFailureOnly="False" ShowBack="True" ShowCancel="True" Timeout="180" TimeoutAction="ContinueOnWarning">
        <!-- Warn if AC Power is not connected -->
				<Check Text="AC Power" Description="System connected to AC Power" WarnDescription="Please ensure that the system is connected to AC Power." WarnCondition='"%XOnBattery%" = "False"' />

        <!-- Fail if not connected to wired network -->
				<Check Text="Wired Network" Description="System connected to Wired Network" ErrorDescription="Please ensure that the system has a wired network connection" CheckCondition='"%XWiredLANConnected%" = "True"' />

        <!-- Warn if UEFI not enabled -->
				<Check Text="UEFI Enabled" Description="UEFI Boot enabled in BIOS" WarnCondition='"%XSystemUEFI%" = "True"' WarnDescription="For security purposes, UEFI should be enabled."/>

        <!-- Warn if Secure Boot not enabled -->
				<Check Text="Secure Boot Enabled" Description="Secure Boot enabled in BIOS" WarnCondition='"%XSystemSecureBoot%" = "True"' WarnDescription="For security purposes, Secure Boot should be enabled."/>

        <!-- Fail if TPM is available but not enabled -->
				<Check Text="TPM Enabled" Description="TPM Chip enabled in BIOS" CheckCondition='"%XTPMEnabled%" = "True"' ErrorDescription="For security purposes, TPM should be enabled." />
			</Action>
		</ActionGroup>

		<Action Type="TSVar" Name="UIPlusPlusFinished">"True"</Action>
	</Actions>
</UIpp>
ChooseTaskSequence.ps1 and ChooseTemplate.xml will automatically read the options defined in the “Define TS Choices” step above, and convert them to XML.
You can delete the “Input” and “Preflight” actions if you do not wish to show these screens. If you leave the “Input” action, the computer will automatically be named the value of this step which sets the “OSDComputerName” task sequence variable.
For more information on customizing the UI and using Preflight checks, view the UI++ documentation.
Once your files are all ready, create a new package in MECM and set the source files to the folder you created containing ChooseTaskSequence.ps1, ChooseTemplate.xml, and your UI++ folder.
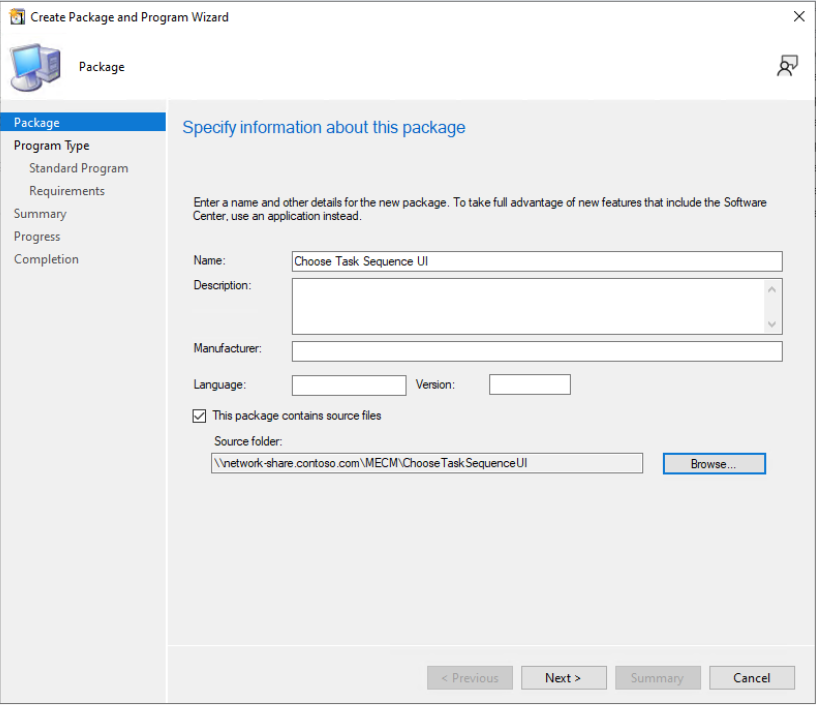
As this package will only be used for distributing source files, do not create any programs for the package, then distribute your new package to a distribution point.
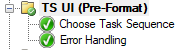
TS UI (Pre-Format)
Our Pre-Format group will consist of two “Run PowerShell Script” steps (“Choose Task Sequence” and “Error Handling”).
In the first “Run PowerShell Script” block, choose to “Select a package with a PowerShell script”, choose your newly created package, then set the “Script name” to “ChooseTaskSequence.ps1”. Make sure to set the execution policy to “Bypass” and enable “Continue on error”.
Then set the content of the second PowerShell script to the following from the “Enter a PowerShell script” option:
Show Code Block
$TSEnv = (New-Object -COMObject Microsoft.SMS.TSEnvironment);
Add-Type -AssemblyName PresentationFramework

$ErrorMessage = @"
Unable to launch Task Sequence UI

Must format drive before launching task sequence menu. Click OK to format. Click Cancel to reboot
"@

if ($TSEnv.Value('UIPlusPlusStarted') -eq $False) {
  (new-object -ComObject Microsoft.SMS.TsProgressUI).CloseProgressDialog()
  $popupChoice = [System.Windows.MessageBox]::Show($ErrorMessage, "Task Sequence Error", "OKCancel", "Error")

  if ($popupChoice -eq 1) {
    Exit 0
  } else {
    $TSEnv.Value('UIPlusPlusIgnoreError') = 'True'
    Exit 1
  }
} else {
  if ($TSEnv.Value('UIPlusPlusFinished') -eq $False) {
    $TSEnv.Value('UIPlusPlusIgnoreError') = 'True'
    Exit 1
  }
}
and make sure that “Continue on error” is not enabled.
Prepare OS Disk
Next, if desired, format the operating system disk in this group. This can be done by using the “Format and Partition Disk” step. Additionally, you may want to add an error dialog if no disk is detected in the system, preventing the task sequence from continuing without a disk present.
To add an error dialog for disk detection, add a “Run PowerShell Script” step with the following content:
Show Code Block
$TSEnv = (New-Object -COMObject Microsoft.SMS.TSEnvironment);
(new-object -ComObject Microsoft.SMS.TsProgressUI).CloseProgressDialog();
Add-Type -AssemblyName PresentationFramework
$ErrorMessage = @"
No Disk Found. Please check your hard drive and try again. If error persists, please run DISKPART to manually format the hard drive.
"@
[System.Windows.MessageBox]::Show($ErrorMessage, "Task Sequence Error", "OK", "Error")
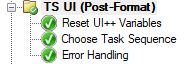
Exit 1 TS UI (Post-Format)
Finally, in order to run the UI again after the disk has been formatted, if the previous attempt to show the UI failed, we must reset the UI++ task sequence variables, and call the “Choose Task Sequence” script again.
Start by adding a rule to the “TS UI (Post-Format)” group to only run when “UIPlusPlusFinished” equals “False”.

Then, add three steps to the group, “Set Dynamic Variables”, and two “Run PowerShell Script” steps (“Choose Task Sequence” and “Error Handling”)
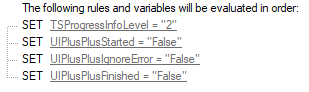
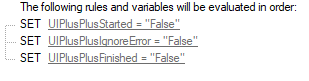
In the “Set Dynamic Variables” step, we will reset all of the UI++ variables in case UI++ started but failed to complete previously.
Next, in the first “Run PowerShell Script” step launch the same script as the “Choose Task Sequence” step in the “Pre-Format” group by choosing “Select a package with a PowerShell script”, selecting the newly created package, and setting the “Script name” to “ChooseTaskSequence.ps1”. Make sure to set the execution policy to “Bypass” and enable “Continue on error”.
Finally, in the last “Run PowerShell Script” step, run the following from the “Enter a PowerShell script” options:
Show Code Block
$TSEnv = (New-Object -COMObject Microsoft.SMS.TSEnvironment);
Add-Type -AssemblyName PresentationFramework

$ErrorMessage = "Unable to launch Task Sequence UI. Please check the disk and try again."

if ($TSEnv.Value('UIPlusPlusStarted') -eq $False) {
  (new-object -ComObject Microsoft.SMS.TsProgressUI).CloseProgressDialog()
  [System.Windows.MessageBox]::Show($ErrorMessage, "Task Sequence Error", "OK", "Error")
  Exit 1
} else {
  if ($TSEnv.Value('UIPlusPlusFinished') -eq $False) {
    $TSEnv.Value('UIPlusPlusIgnoreError') = 'True'
    Exit 1
  }
}
and ensure that “Continue on error” is disabled.
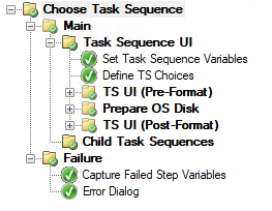
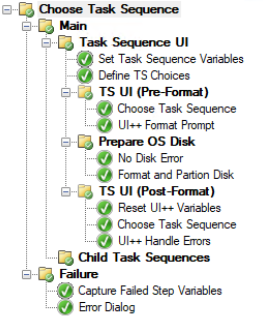
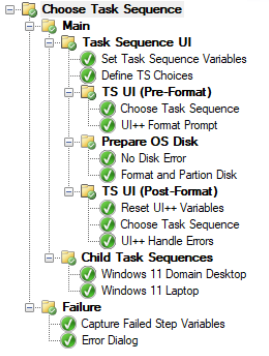
At this point our Task Sequence should look like this:
Child Task Sequences
Finally, we can start adding some child task sequences based on the options we defined earlier.
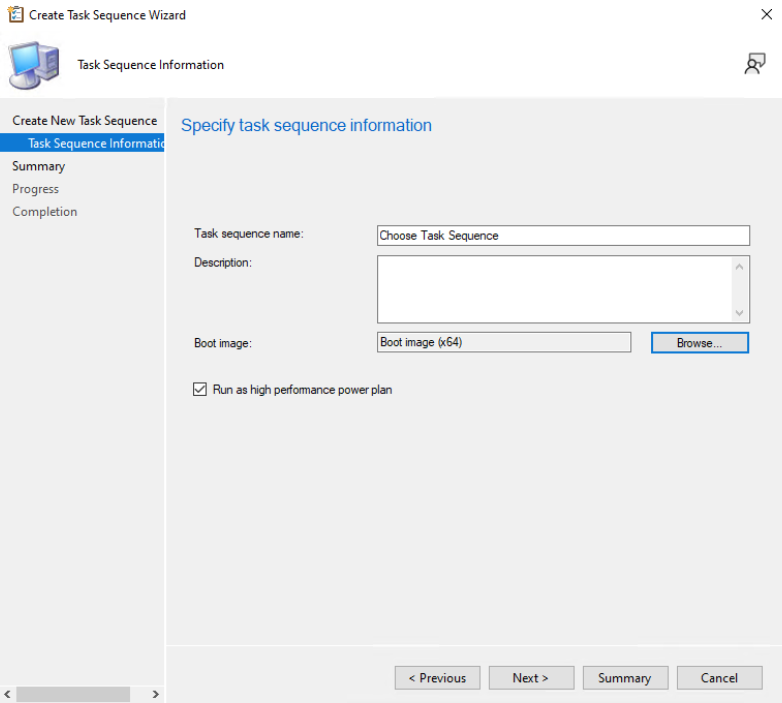
In the example above, we defined two options “Windows 11 Domain Desktop” and “Windows 11 Laptop”, therefore we will create two child task sequences for these options. Begin by creating a new “custom task sequence”. In this example, I will name it “Windows 11 Domain Desktop”.
In order to embed one task sequence inside of another, we must leave the boot image empty, as shown above.
Within this child task sequence, you can now add any logic that is specific to this option, such as application groups, for example.
If you do not wish to continue with adding more conditional logic in part 3, you may want to add steps like applying operating systems, joining the domain, etc. inside of your child task sequence, though I will demonstrate how to do this in the main task sequence in part 3.
Continue creating child task sequences for all of your desired options, then return to the main task sequence.
Inside of the “Child Task Sequences” group, add each of the child task sequences you have created as “Run Task Sequence” steps.
For each option you add, you must add a condition to only the step when the “ChooseTS_Name” variable matches your desired option.

This step is essential, and failure to do so will cause your task sequence to run multiple child task sequences that you do not intend to run.
If you are planing to add common logic like applying operating systems and joining the domain to the main task sequence in part 3, and are only using child task sequences for things like application installations, you can also share a single child task sequence for multiple options. For example, if you had a Windows 10 Domain Desktop and Windows 11 Domain Desktop, you may want to install the same actions and only apply a different operating system image.
This can be accomplished by adding an OR condition in the task sequence variables, and following the dynamic image instructions in part 3.

At this point, you now should have a fully functioning task sequence, and can embed all of your traditional task sequence logic besides disk formatting into your child task sequences.
Part 3: Dynamic Images & Configuration
While we’ve now have error handling, the ability to add new task sequences without creating deployments, and a nice UI that names and runs preflight checks against computers, we still haven’t accomplished the goal of removing duplicate steps between task sequences.
To do so, we will add a number of conditional groups to the main task sequence that only run based on the other variables we defined in the first step, such as “Image” and “Type”. You can continue to add conditional logic such as that defined in this section by adding more variables to the “Define TS Choices” step and “ChooseTemplate.xml” file, as outlined above.
If you do not wish to use the logic defined here, you can accomplish a similar result by creating a a new task sequence for each common step, such as joining the domain, then embed that task sequence within your other task sequences, similar to how we embedded the child task sequences.
Dynamic Images
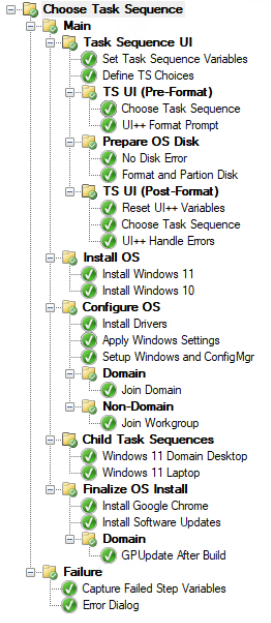
Create a new group after the “Task Sequence UI” group called “Install OS”. For each different image you defined in “Define TS Choices” add a new “Apply Operating System Image” step, with a condition to only run when “ChooseTS_Image” equals your desired value, like so:

Similar to the child task sequences above, you must ensure that every step within this group has a task sequence variable condition, or else you will apply the wrong image to your machines.
Dynamic Configurations
Next, create a group after the “Install OS” group called “Configure OS”. From this group you can perform any common actions you wish to perform before running the child task sequences such as installing drivers, applying Windows settings, installing the ConfigMgr client, etc.
In this case, I will also be conditionally running actions based on the “Type” variable we set earlier, to join the domain if the type is “Domain” or join a workgroup if the type is “Non-Domain”. Like before, we simply need to add a task sequence variable condition to the step or group we want to run.


Finally, you can repeat the same process after the “Child Task Sequences” step to perform any finishing touches you want to apply to all computers such as installing common apps and configuring Windows settings. In my case, I will add a “Finalize OS Install” group to install Google Chrome and run software updates on all machine, and run a GPupdate on domain machines.
Part 4: Publish Standalone Task Sequence Options
I manage many different task sequences and use Choose Task Sequence to help hide some of the task sequences that are rarely used, but for those task sequences that are being used every day, it may be desired to still have them deployed as a standalone option, allowing technicians to start builds without having to go through the prompt to choose a specific task sequences.
This is still possible with Choose Task Sequence, but requires some additional configuration.
First, make sure that your main “Choose Task Sequence” TS does not have a boot image assigned and delete any deployments you may have made. I like to rename the task sequence to “Choose Task Sequence Embedded” when it does not have a boot image and is intended to be embedded inside of other TS.
Next, create two new custom task sequences. I will be making two called “Choose Task Sequence” and “Windows 11 Domain Desktop”, both with a boot image assigned.
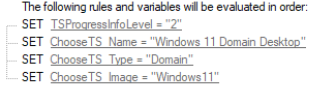
Inside of “Choose Task Sequence” add two steps “Set Dynamic Variables” (named “Configure Choose TS) and “Run Task Sequence” (named “Run Choose Task Sequence). In your “Set Dynamic Variables” step, set “TSProgressInfoLevel” to “2”, and in your “Run Task Sequence” step, run your “Choose Task Sequence Embedded” TS that no longer has a boot image assigned.


Inside of “Windows 11 Domain Desktop” follow the exact same steps, but this time, set your Dynamic Variables to the variables you specified in your “Define TS Options” step, in my case with “Name”, “Image”, and “Type”, I have the following configuration:
Now, you can deploy your new task sequences to your desired groups, and when technicians launch “Choose Task Sequence”, they will have the option to choose an option, but when they run “Windows 11 Domain Desktop” it will skip the selection prompt and continue to the next prompt, or start the task sequence, if configured.
Final Thoughts
Thanks for reading! I hope this post will help you improve your task sequences and provide a better experience for your users and technicians.